This page is an archive of a film and support materials I created in my second year of the Animation MFA program at USC.
Description
Glimpsed in the peripheral vision of Chester Gould's third eye, this hard-boiled mutation skulks and skitters among the shadows of angular men, decadent guns and deadly fedoras in a radioactive comic strip of tommy-gun nonsense. - Spencer Parsons, Cinematexas
Crimenals is an animated collage of film noir soundtracks and detective comics panels. The narratives of each have been stripped away as the images and sounds are broken down, manipulated, and recombined to form an absurdist homage to these genres.
Concept
The idea for Crimenals developed from the re-working of ideas for my second-year production. I chose to pursue a filmmaking process that would implement a more experimental approach than what I had done for my meticulously planned first-year production Rest In Peace. Rather than executing a completely resolved set of drawings and camera instructions as I had with my last film, I chose to work more spontaneously and let the details resolve themselves as I progressed along. I also decided to keep the scope of the film intentionally small. In practical terms, this meant a simple visual style and a short (under three minute) running time.
Collage Format
I chose to create an animated collage for a few reasons: I have used collage as an Illustrative device in the past, and it seemed to me an obvious choice for experimentation. The main inspiration for using comic strips as a resource was the series of Tricky Cad paste-ups done in the 1950’s by Jess (Burgess Collins.) I decided to take a similar approach for my film’s visuals. The sound for my film would be a collage as well, so I planned to cut together a soundtrack from fragments of Film Noir movies from the same time period as the comics.
Jess, Tricky Cad: Case VII (detail), paste up, 1957
Sound
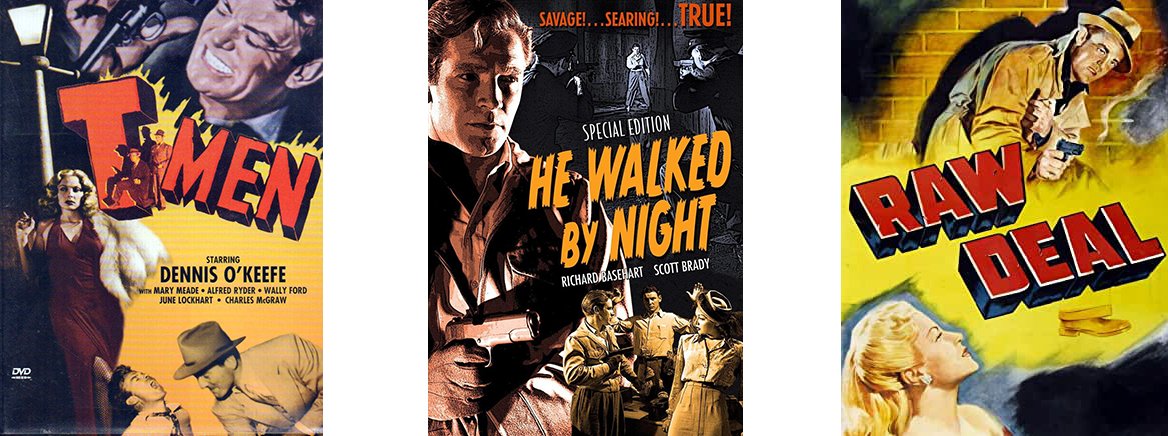
Since visual action was to be driven by the soundtrack, the sound would have to be completed first. I digitally extracted the complete soundtracks from three Film Noir movies directed by Anthony Mann: T-Men, He Walked By Night, and Raw Deal. From there, I cut each soundtrack into clips containing single lines of dialogue. I was careful to use only clips with as little ambient sound or music as possible. Due to the production level of these films, almost every line of dialogue was useable in this way. I saved each sound clip in a folder corresponding to each actor so I would have a consistency among voices if needed. An added benefit of using these specific films was many of the same actors appeared in all three, so I ended up with a fair amount of material to choose from. After cutting up the first film, I created a database of the sound clips with fields like actor name, line spoken, and emotional tone. I thought this would become useful later on in creating my soundtrack, but after cutting up the third film, I had become familiar enough with the lines that I already had a sense of which ones could work together. I never returned to complete or use this database.
After the sound library was built up, I edited together a rough cut of the soundtrack. Dialogue was created by editing words spoken by the same actor but from different scenes, or from other films entirely. On some occasions, new words were fabricated by the careful splicing together of phonemes. The film’s title word Crimenals is an obvious example of this. All of the dialogue was created in this way. Short scenes were then built up from the juxtaposition of spoken lines that created a mood or had a common theme. The scenes were then assembled into a complete sequence. The addition of a music loop and some sound effects created a working soundtrack for picture.
Picture
Creating the visual component was a process analogous to compiling the sounds. I considered sourcing from several artists such as Will Eisner, Chester Gould, Bernard Krigstein, and Jack Cole before deciding to use only Gould’s Dick Tracy comics. I scanned several complete serials from volumes checked out of area libraries. Each page was scanned in at high resolution and processed for consistent white and black levels.
Text comprises a large part of the Tricky Cad paste-ups, and although I would attempt a similar manipulation of words in Crimenals, I knew the majority of my film’s text would be aural. The small amount of written text, however, needed to be explicitly editable as well as visually consistent with the Chester Gould aesthetic. To this end I created a digital typeface of Mr. Gould’s hand lettering. Scanned images of letters from various comic panels were used as templates that were traced over in Adobe Illustrator and subsequently imported into Macromedia Fontographer, from which a TrueType format font was generated.
bespoke Chester Gould typeface
In order to facilitate the moving collage effect, I initially decided to use the 3d animation environment of AliasWavefront’s Maya. Within Maya, I wanted to be extremely conscious of preserving the flatness of the two-dimensional art, as well as to explore more uncommon representations of 3d computer graphics. My solution was to make characters using a simple inverse-kinematic skeleton. Each joint on the skeleton had a nurbs plane parented to it with a texture map of a specific body part and corresponding transparencies mapped onto it. This created something that behaved like a jointed paper cutout.
Shading networks were created in Maya to mimic the look of black line art with colored regions of offset-printed halftone screens. A procedural shader was created for the color halftones, while the line art from the bitmap images was composited overtop. Attribute sliders were created to interactively control settings such as halftone color, dot size and density, and screen angle. Other high-level controls created for the characters included sliders for scrubbing frame sequences on a particular nurbs “card” – useful for animating replacement head turns or lip sync mouth shapes. Another feature to be implemented was global control over visibility of color or line information. This would be used for multiple render passes. The idea was to have the animation of the colors on a separate layer from the line animation. Their relative timing could be skewed when composited together so that the color action would bleed outside of the lines, a reference to the abundant mis-registration found in comic book printing. Mitch Cockerham was instrumental in introducing me to building complex shader networks, as well as getting me started with mel (Maya’s scripting language), which was used to implement many of the controls described above.
procedural "halftone screen" shading network (left)
and render view (upper right)
Shot Planning
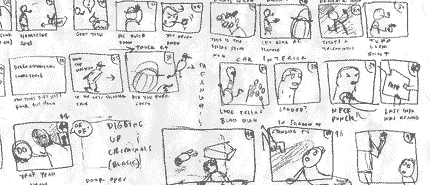
Up to this point I had done a minimal amount of storyboarding. The goal was to achieve a whimsical, nonsensical visual look, to be created spontaneously in response to the soundtrack. Since the visuals would be largely improvisational, I was hesitant to begin making imagery until it was absolutely necessary. After successful test characters were built in Maya, it was time to create a storyboard with rough blocking to determine what characters would be created, and what range of motion they required. The storyboard was done in one pass on a big sketchpad page with a series of extremely crude thumbnail drawings representing each shot.
Listening to the soundtrack, I quickly sketched out the blocking for each scene with specific characters or locations in mind. From there, I put together an animatic based on the storyboard. It was at this point that I determined exactly how each character would be constructed, and how each shot would look. The “improvisational performance” or resolution of visual ambiguity was executed at this stage.
storyboard detail
Animation Production
Adobe AfterEffects was used to create the animatic. Using the storyboard panels as a guide, I created layered Photoshop files for each scene containing characters broken apart into limbs or other components as well as background elements. These files were imported into AfterEffects as compositions. Each composition was a separate shot and contained the full soundtrack. Animation was done to match the audio for each specific scene. The scene compositions were placed in a master composition, each starting at frame zero to ensure synchronization among all scenes.
The character animation relied heavily on layer parenting in AfterEffects. Simple transformational hierarchies could be created using layer parenting so, for example, a shoulder – elbow – wrist hierarchy could be made and animated using forward kinematics. Another use for layer parenting was for camera movement: several elements could be parented to a master solid layer whose visibility was turned off. By transforming this layer in x and y space, all objects would move in correct relation to one another, simulating a camera move. Depth of field effects were used to literally focus attention on speaking characters, who lacked lip-sync at this point. This was achieved through synchronizing the Fast Blur effect on multiple layers. Although AfterEffects allows manipulation of cameras and objects in three dimensions, I did not see any benefit to working in its 3d space. I was getting the results I wanted quickly and easily by sticking with two dimensions.
Character layers prepared for AfterEffects
The animatic was to serve as a reference for how to efficiently set up each shot in Maya, however the response I received from preliminary screenings made me reconsider how to continue my production process. Rather than move onto the Maya production stage, I decided to use my remaining schedule to refine and complete the film in its more primitive incarnation. There were a few factors contributing to this decision: The animatic accomplished the audio and visual styles I set out to explore, succeeding as a collage film, and preserving a crudeness and immediacy I wanted to capture. Although I considered it a work in progress, it hit very close to how the film looked in my imagination. The process of recreating it in Maya would require a substantial further effort, introducing an entirely new production process, and resulting in a film only marginally different from what I had already completed.
The completion of the film now involved a refinement process that ranged from minor adjustments to scene blocking and animation to reworking entire shots. Lighting effects were added throughout to suggest a sense of depth and space. Lip sync animation was created in Maya by applying some newly learned melscipting: Five mouth positions were mapped as textures onto a single nurbs plane. The frame extension for each mouth texture was an animatable attribute, so only one texture would be visible at a time in correspondence to the value of the attribute. A short script was created for each mouth shape to map it to the plane and set a key for the current frame. Each of these scripts was mapped onto buttons. The resulting workflow was to scrub through the timeline listening to the dialogue, and hitting the button that set the correct mouth shape at each frame. The speed and simplicity of this technique allowed me to complete the lip sync for the film in one night. Frame sequences were exported for each line of dialogue requiring lip sync, then brought into AfterEffects and parented to the appropriate body parts.
My approach to the completion process was to change as little as possible from the first pass of the film. The intent was to augment some the details rather than to bring the entire piece up to a high and even level of refinery. A few particularly unresolved scenes were reworked, but overall the final film preserves the energy and spontaneity of the first animatic.
Thanks again to Faculty Advisors Kathy Smith and Midge Costin, to Juri Hwang for the final sound mix, and to Mitch Cockerham for his indispensable assistance with Maya scripting and shader networks.
Festival Poster


